Heitec scanning systems and Hexagon’s CT analysis software are providing a big German automaker with an innovative solution to scan e-engine housings during active production in a very short time.
CT scans in 50 seconds
The success of the assembly line is inexorably tied to the quality of the components fed to it from production. As the complexity of modern vehicles has risen dramatically in recent decades, particularly in the case of electric ones, the value of pre-assembly quality checks at key stages during active production has become increasingly apparent. In addition to various methods of surface scanning, some of the leading automotive manufacturers (along with others in aerospace, energy and electronics) are using computed tomography (CT) to inspect deep inside complex components to ensure they are fit to send to the assembly line. Certainly CT scanning is expensive, but so is only finding out that costly components are defective after a vehicle rolls off the assembly line.

The savings achieved in time and resources when valuable automotive parts are inspected for quality before they are installed in a vehicle can be significant. For this reason, BMW is CT scanning the engine housings of its iX model EVs. In contrast to the company’s other current electric vehicles, the iX is based on an independent platform. But it uses the same drive unit (motor, inverter, transmission) known as HEAT (Highly-Integrated Electric Drive Train) that is employed in the other BMW models. Ensuring the quality of this valuable drivetrain is a priority for the automaker.
A combination of robots, scanners and software on the line
At its facility in Landshut (Germany), BMW is using a combination of in-line robotics, CT scanning and detection, and analysis and visualization software, to inspect the HEAT e-engine housing during active production. The entire system was installed and integrated into the production line by Heitec, a global engineering solutions provider for a broad range of industries. The installation delivers a continuous-flow process in which a robot plucks an aluminum housing off the production line, deposits it on a platform that feeds it into a HeiDetect Inline CT scanner, then shifts to the other side of the scanner to retrieve an already-scanned component and move that one back to the line. Each scan takes place in 50 seconds.
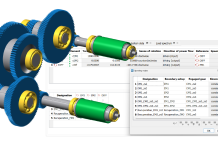
Post-scan, Heitec’s proprietary software quickly generates a digital model of each housing from the CT data, then transfers the model to Hexagon’s VGinLINE software for rapid segmentation and analysis. Viewable on-screen by engineers, graphic-and-colored alerts are automatically generated to call out any significant porosity, cracks, geometric inconsistencies, or other production or material flaws that deviate from BMW’s specific metrics requirements and might impact quality.

Accurate production insights at speed
Heitec customizes every installation to the specific customer and sets up the robots and CT scanners. A key element of the scanning is time: doing all in the cycle time of the production line is the real challenge. In the past a problem of the industrial computed tomography could be the long time needed: «hours for scanning and gigabytes of data to sift through for defects – says Heitec co-founder Christian Abt –. That’s not the case here in production, there’s no time for that kind of delay». The solution for rapid-inspection results is employing lower-resolution industrial CT scans that need significantly less time to capture an image, plus Heitec’s scanner-integrated software designed to process this “less-heavy” information and reconstruct the component’s volume data into a 3D computer model. This data is then loaded into holistic analysis and visualization software that queries the digital model, employing sophisticated algorithms and, most recently, deep learning to reliably identify, interpret and report potential quality issues despite the noisy images, within a short time window. «For the kind of advanced data processing software that would deliver the metrology results our customers were asking for, we found our way to Hexagon’s VGSTUDIO MAX and VGinLINE – explains Abt –. We had evolved from software developed for research to the situation where industry was asking for more standard and pre-qualified digital tools. Everyone was aware of VG software; it was, and is, the standard in CT software. The complete infrastructure of VGinLINE is a ready-to-use software package that allows us to easily integrate our own modules and functions, enabling us to combine accepted standards with flexibility. We just drop out a volume and VG starts to analyze it».

This process is also easy to parallelize to more than one computer to speed things up in case the time for analyzing the data is slightly longer than the time to scan the part. «The huge quantities of design and engineering data that can be captured by CT – says Daniela Handl, Hexagon’s general manager for VG products – need a holistic approach, coupled with robust computational capabilities, to be most valuable. Rapid results delivery is critical for engineers looking for real-time insights into production-line quality as well as how manufacturing-parameter variations might be affecting outcomes». Key to determining which data is significant in the scan of a component is the process of segmentation, the extraction of regions of interest from the 3D image data. Abrupt discontinuities in voxel grey-values typically indicate edges that define a region. By partitioning a scan into discrete regions, the software can more rapidly focus on and catalogue the characteristics of the voxels in each segment. Segmentation thus enables the processing of only the important portions of a dataset, which takes a lot less time.
Customizing proprietary solutions with machine learning
How to determine which segments are the important ones is therefore crucial. Especially since, in a lower-resolution CT scan obtained on a production line, the less-crisp image slices can be more challenging to understand. This is where deep- and machine-learning, forms of Artificial Intelligence, comes into the picture: using trainable algorithms, AI can be harnessed to process and make decisions based on noisy CT data as accurately as on hi-resolution data. “Trainable” is the key word here. The algorithms compare what they see against an existing database of all known identifiable defects that have been customized to each manufacturer’s product geometries. The algorithms “learn” to identify specific manufacturing flaws by interpreting what the less-crisp voxels show.

Over time, deep learning gets even better at what it does; by comparing what it sees against real-world product data for which the solution is known, it learns to recognize patterns and features and call out deviations from the norm. In this way, it can provide highly accurate snapshots of what’s actively happening on a particular production line, supporting confident decision-making about whether to accept or reject a part. This in turn informs production-variable changes, the effects of which can be captured, collated, and statistically examined. In addition to the engine housings, EV batteries are another area in which machine learning can be used in this way.
How to optimize this kind of AI methodology is what BMW is now exploring. The aim is to create internal data sets with which to train an in-house deep learning system.
See a video of the process here:


